With summer now in full swing, the desire (or pressure, depending on your specific situation) to go camping is continuing to build. Your buddies who own top-dollar fifth-wheel campers have been begging you to join them in the great outdoors, but the thought of pitching a tent and sleeping on the ground doesn’t excite you and a camp trailer just isn’t in the budget right now.
So I guess you’re out of luck, right? Actually if you have a truck and a desire, it’s possible to convert your daily driver pickup into your own mini-camper for less than you might think if you take the right steps.
Step 1: A.R.E.
The first step is the biggest one because after adding a truck cap, the rest is just icing on the cake as far as your camping experience is concerned. One of the reasons A.R.E. Accessories LLC has become one of the premier choices in the truck industry is because each truck cap is custom-built and made specifically to fit your exact truck. For the Ohio-based manufacturer, there is no such thing as one size fits all.
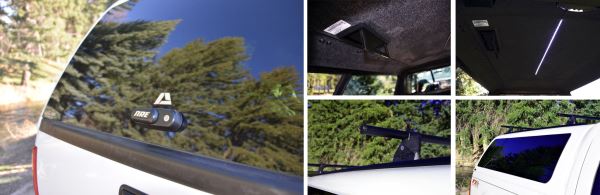
To begin the process of adding an A.R.E. truck cap, it’s best to begin on its website. Here you can research the different options available so you customize your truck cap to fit your specific needs. For us, the Z-Series was our best option and as is, A.R.E. already offers a lot of great standard features with each one, including a fabric headliner as well as screen-vented side windows. We decided to upgrade to 12-volt LED lighting, tilt-down front window, as well as an interior clothes rod. On the exterior we went with the Yakima Roof Rack on top that will not only give us options for transporting more gear, but it also completes the look. Prices vary from A.R.E., but generally fall between $1,500 to $3,500 depending on features and options.
When placing our order, we were able to select our nearest or preferred dealer for the installation. In this case, Auto Trim was both our closest and preferred dealer because this is a shop that has been meeting and exceeding expectations for years in Idaho Falls, Idaho. We’ve worked with owner Vaughn Kendle and his crew in the past with other A.R.E. covers and they always go the extra mile to ensure we’re happy with the results.

Steve Azevedo, who has been with Auto Trim for over seven years, was assigned to do the install.
Steve hooked up the cables so the rear brake light on the cover—as well as the LED lights inside—would have the power needed once the cap was installed.
Adding the perfectly color-matched cover instantly improved the look of the truck. Now it was time to add those other details to complete our camping transformation.
Step 2: AirBedz
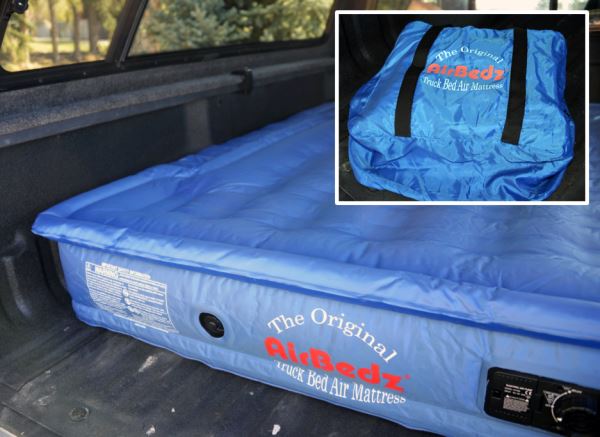
Another option A.R.E. offers is The Original Truck AirBedz air mattress that is designed specifically for your truck bed and includes cutouts for the wheel wells. There is nothing else quite like it and what impressed us the most is the built-in air pump. After charging the removable battery for 10 hours the first time we got it, the pump was ready for action. We simply rolled it out in the bed, turned the dial to inflate, and stood back and watched it perfectly form to the bed of the truck. The AirBedz air mattress (MSRP: $219.99) is the perfect complement to the A.R.E. truck cap and to deflate you simply turn the dial to deflate and all the air is removed so it can go back easily into the original storage bag. We also ordered the wheel well inserts (they Velcro in where the wheel well cutouts are) so the mattress can be used at home if needed. This manufacturer truly thought of everything.
Step 3: Ascend Sleeping Bag
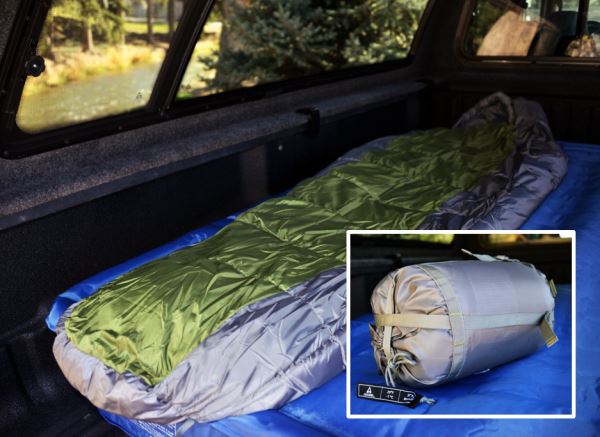
The next logical step was to include a sleeping bag. We started with Bass Pro Shops because this company is known for having a wide range of camping equipment. The large selection didn’t make it an easy choice, but after a little research we went with the Ascend 20 degree Mummy Bag (MSRP: $79.99) that boasts greater heat retention, while still keeping the weight low for easy portability. Featuring a double-layer quilted construction with hollow-fiber insulation, the sleeping bag also comes with a compression stuff sack for easy transport.
Step 4: Coleman Fan
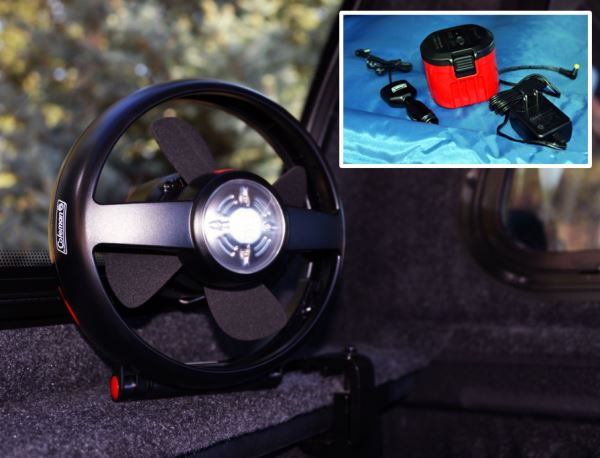
We tried to think of everything when planning the transformation and once we started visualizing the A.R.E. Truck Cap, AirBedz air mattress and Ascend sleeping bag, we knew to truly complete this process we also needed to add some ventilation. This is where the Coleman Lighted Tent Fan CPX 6 (MSRP: $34.99) comes in. The soft blades help make it safe in close quarters and with the optional rechargeable power cartridge (MSRP: $24.99) you only need to keep D-batteries on standby for an emergency. Yes you could still enjoy just the fan, but the optional charger is a must in our book.
Step 5: Let’s Go Aero
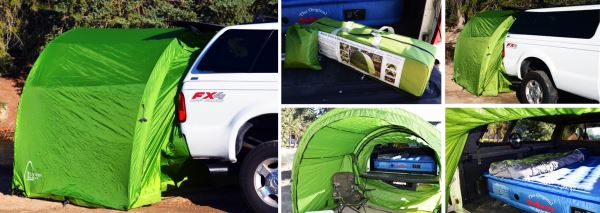
The only downside to this setup so far is you don’t have a designated area outside the truck bed for camping. This is where the ArcHaus Shelter & Tailgate Tent from Let’s Go Aero shines. This is one of those “Why didn’t I think of that?” type of products. The ArcHaus Shelter (MSRP: $399) basically extends the back of your truck to provide a small shelter. Plus it’s versatile so it can be used for tailgating or dozens of other great uses and the aerodynamic arc design provides protection from the elements while giving you more privacy.
The setup is actually quite easy and everything you need is included. The Tailgate Tent zips into the main shelter and with an elastic sleeve and straps, it wraps around your tailgate opening to extend the coverage. It truly is just an extension of your truck bed.
Step 6: Hoister
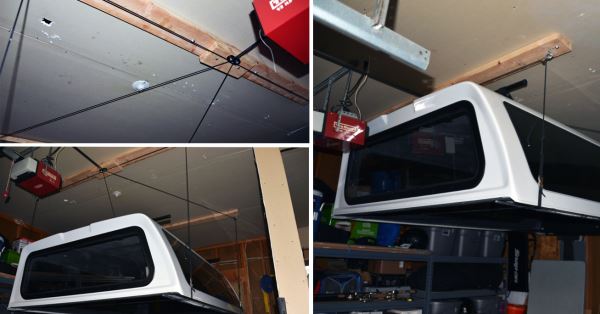
With the camping transformation now complete, camping in the great outdoors is possible and ready when you are. But what do you do if you count on your truck bed as your daily driver for work and it’s not practical to leave the A.R.E. cover on all the time? Removing the cover by unbolting the six clamps is easy, but now where do you store it? This is where the last and final step in our transformation comes in. The Harken Hoister Storage System (MSRP: $188.95) with four lifting points is designed for one-person operation. You can raise and lower the A.R.E. Truck Cap evenly regardless of weight distribution, with a single control rope.
Everything is included for easy installation, including stainless steel hardware and double-braid rope for strength. The key to a successful setup is to be able to locate the studs in the ceiling of your garage. After that it’s just a matter of following the directions. If your joists are covered like ours are, it’s recommend that you add 2X6 boards with four lag bolts each, which can easily be purchased at any hardware store.
Once installed, we backed the truck into the garage, attached the straps under the A.R.E. cover and then raised it up until it was tucked up nicely into the ceiling. Now at a moment’s notice the truck cap can be lowered and reattached to the truck bed for those last-minute camping trips that you’ve declined in the past, but no longer have to.
AirBedz
800-981-2339
www.truckairbedz.com
A.R.E. Accessories
330-481-1333
www.4are.com
Auto Trim
208-529-8746
www.atdidahofalls.com
Bass Pro Shops
800-227-7776
www.basspro.com
Coleman
800-835-3278
www.coleman.com
Hoister
262-691-3320
www.hoister.com
Let’s Go Aero
877-464-2376
www.letsgoaero.com