A wise man once said, “You can never have too much boost.” Spend any amount of time at a diesel event and you’ll see that ethos taken to its logical extreme, and even further, in some cases. Regardless, the principle remains the same. Or at least, it’s what we’d like to think. Either way, we decided to see what we could make happen from a boost perspective on Ford’s much-maligned 7.3L Power Stroke and we came away very impressed.
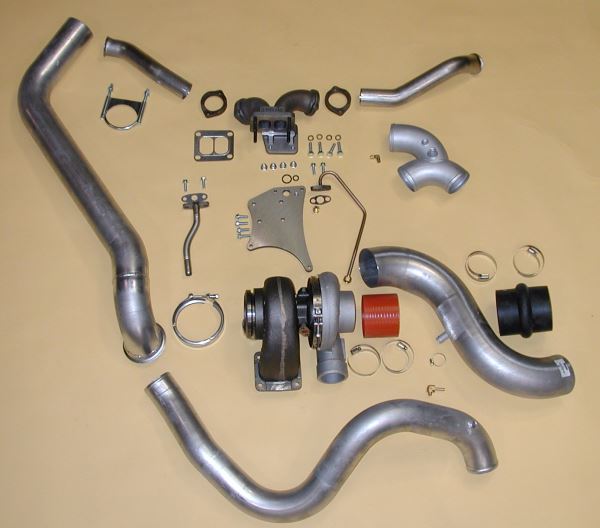
Assisting us in this endeavor is Hypermax’s H-2 turbocharger package. This system is practically a must for any engine running more than 400hp. If you have even a passing interest in the holy trinity of diesel truck activities (towing, sled pulling, drag racing), then you’re going to want to lay your hands Hypermax’s setup. With that kind of application, it’ll get your truck set up nicely for all your day-to-day needs as well. According to Hypermax, “The boost to back pressure ratio is 1:1, meaning when boost pressure is 20 psig the back pressure is also 20 psig.” If you’re so inclined, this system can be upgraded with a larger compressor and exhaust wheels, but we were content to stick with the stock setup. The reason we went with Hypermax is not only their reliability, but also because we knew we’d get reduced back pressure and exhaust temperatures, as well as improved fuel mileage.
To complement the new turbo setup, we decided to also install a new intercooler. Hypermax’s Tapercore intercooler is the perfect match to this turbo setup. They say that a factory intercooler is only adequate up to 300hp, so it only makes sense to add Hypermax’s intercooler to the install, as its proprietary design will help the turbo achieve maximum airflow efficiency.
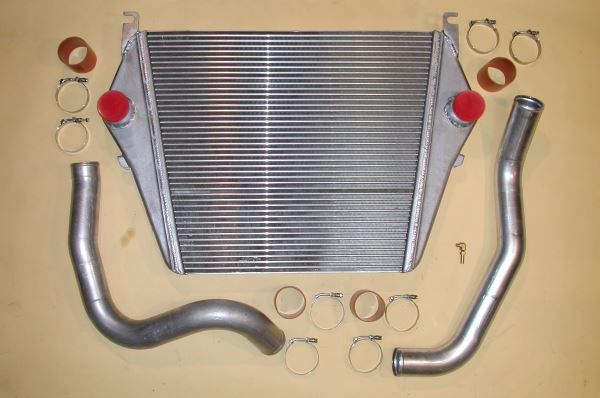
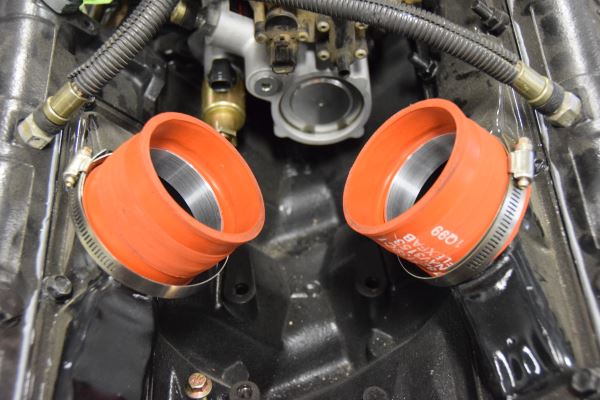
Everything you need for a do-it-yourself installation comes with both kits, including the intake Y manifold, piping, and hoses, to maintain a relatively factory look. The orange boots are a nice splash of color, though. As you can see in the pictures, the old factory parts have seen better days. What do you expect from an almost 20-year-old truck? Definitely time for an upgrade! Installation of this turbo is relatively straightforward, but as I’ve said a hundred times, that doesn’t mean it’s easy. Having the engine outside of the truck can make certain parts of the installation easier, but can complicate others. Plus, that’s only a step worth taking if you already have it out or need to pull it for another more pressing reason, so it’s not necessarily recommended.
The first step (with many steps included within) is to get the old turbo off. To do this, you’ll need to (obviously) disconnect the negative battery cables from each battery. Take off the driver and passenger side intercooler pies, the charge air cooler housing, the turbine discharge pipe from the turbo and the connecting pipe from the exhaust system, and the air inlet pipe. Take off the turbo itself, the turbo mount, and manifold pipes. Finally, remove the turbo oil supply and drain o-rings from the top of the crankcase and remove the rear passenger side engine lifting eye. Cover the intake manifold openings and keep all the hose clamps, exhaust seal rings, upper and lower manifold flanges, and all hardware. There’s no reason to throw any of it out if it’s still good. While you’re at it, now is a good time to also take off the old intercooler. With the pipes removed, it should be pretty easy. The only thins keeping it in place at this point is the brace the hood attaches to when it’s closed, and it can be removed by taking out a handful of bolts.
Now you’re ready to start cooking! As mentioned, you’ll have more specific instructions included with your kit which are also available from Hypermax’s website. Keep in mind that this will probably take you most of a day, especially if you don’t have any help (try to get somebody to help you out. The buddy system works!). I know that “real men” don’t follow instructions, and not every engine is going to look and behave the same, so your mileage may vary on how closely you’ll follow the instructions, but keep them handy just in case, especially since I’m going to be glossing over the finer points. Case in point: we had a trained technician help us out, so we perhaps did things out of the prescribed order.
So what did we do? We started the up pipes on the bottom, connecting them to the exhaust manifolds on the engine. That’s going to be a tight fit, since they’re at the back of the engine bay, but it’s doable. Next, we mounted the turbo pedestal to the mounting plate with the provided hardware and made sure everything was snugged up tight. At this point, you’ll need to make sure that there’s enough clearance for the passenger side fuel line, which is a thin metal tube. You’ll need to be careful and bend it as necessary so everything fits right.
Mount the plate itself onto the engine and tighten the bolts down, taking care to line up the up pipes accordingly. Install the T4 connector, and then put your turbo drain tube assembly in. The turbo itself will mount to the pedestal and you’ll start to see how close you are to wrapping up. The Y bridge is a pretty quick drop-in part, with the provided clamps and boots keeping it in place just in front of the turbo. One thing that ended up being kind of tricky to install was the feed tube between the turbo and the mounting plate. It’s a relatively small tube and was hard to get leverage on, especially with the cramped quarters. You can get it into place by hand, then use a proper pry bar to get it set and you’ll be good to go.
Next up is installing the intercooler pipes. We put them into place with the boots and clamps, but didn’t tighten the clamps yet so we could make adjustments later once the intercooler was in. The pipes will run a little different than the stock setup, but not enough to need to make other adjustments.
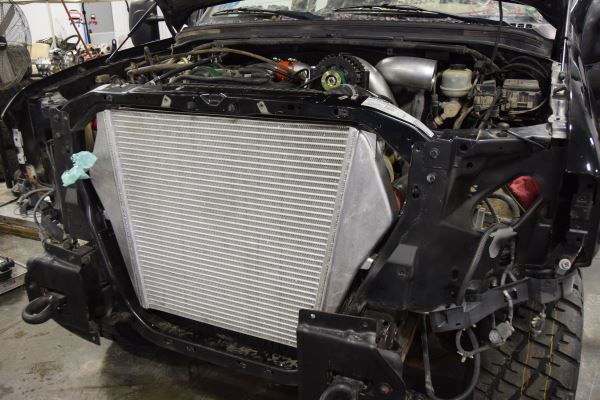
At this point, you should be able to put the new intercooler in place with relative ease. It almost literally just sits there, with a couple brackets that rest against the frame of the engine bay. Hook up the pipes to the corresponding spots on the back, tighten your clamps, and you’re good to go. At this point, we went back through every spot and made sure all clamps and bolts were as tight as possible, and it looked like a job well done! So how did everything perform?
We took the truck up some trails and not only did the turbo spool early enough in the RPM cycle to give us the boost we needed to make it through the rough terrain, but the improved piping both in the turbo and intercooler helped keep all of temperatures low. We couldn’t be more impressed with how Hypermax’s setup breathed new life into the 7.3.
Source
Hypermax
847-428-5655
www.gohypermax.com